> ## Documentation Index
> Fetch the complete documentation index at: https://docs.semgrep.dev/llms.txt
> Use this file to discover all available pages before exploring further.
# Create a Semgrep account and set up organizations
**YOUR DEPLOYMENT JOURNEY**
* You have gained the necessary [resource access and permissions](/deployment/checklist) required for deployment.
Create a Semgrep account by signing in to Semgrep AppSec Platform with your GitHub or GitLab account. This enables you to:
* Add the rest of your GitHub or GitLab organization (org) members to Semgrep.
* Configure Semgrep to scan repositories in other source code managers, such as Bitbucket.
**USING SSO FOR YOUR INITIAL SIGN-IN**
Alternatively, reach out to [ sales@semgrep.com](mailto:sales@semgrep.com) to set up SSO. This removes the need to sign in through a GitHub or GitLab account if you do not have one.
## Semgrep AppSec Platform
Semgrep AppSec Platform is used to manage all Semgrep products, and it is where you can:
* View and manage your Semgrep findings.
* Customize how Semgrep scans your code.
* Manage the users associated with your Semgrep organization.
* Set up alerts and notifications, including Slack alerts, emails, and pull request or merge request comments pushed to your source code manager
## Initial sign in to Semgrep AppSec Platform
The following steps walk you through creating a **user account** and your first **organization**:
To sign in using your GitHub account:
Navigate to the [ Semgrep AppSec Platform login page](https://semgrep.dev/login/) and click **Sign in with GitHub**.
Click **Authorize semgrep-app** to [grant Semgrep the needed permissions](/deployment/prepare/scm-permissions#github-app-permissions) and proceed.
Enter an **organization name** when prompted then click **Create new organization**. This organization name is typically the name of the org in GitHub that you want to connect Semgrep to. For individual users, this can also be a personal account.
Either select a **scan environment** or click **Don't want to connect to anything yet?**
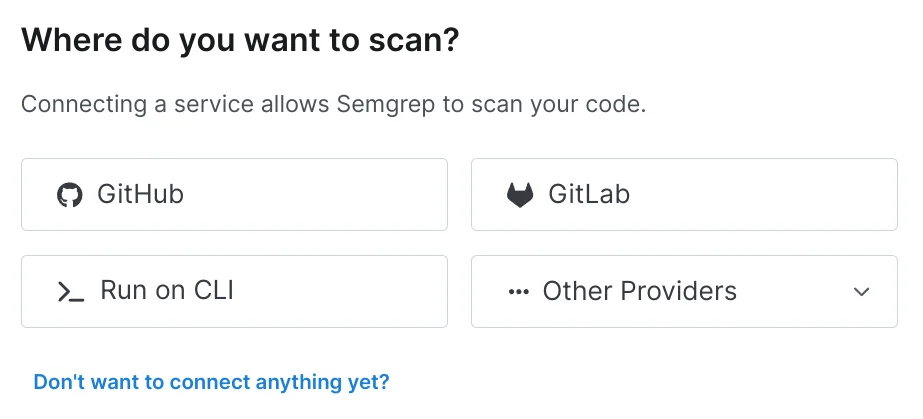 If you selected a **scan environment**:
i. Follow the prompts to set up the scan.
If you clicked **Don't want to connect to anything yet**:
i. Choose either **Skip setup** if you prefer not to scan anything yet or **See demo project** to view how Semgrep scans and presents findings from a demo `juice-shop` project.
To sign in using your GitLab account:
Navigate to the [ Semgrep AppSec Platform login page](https://semgrep.dev/login/) and click **Sign in with GitLab**.
Click **Authorize** to grant Semgrep the needed permissions and proceed.
Enter an **organization name** when prompted then click **Create new organization**. This organization name is typically the name of the org in GitLab that you want to connect Semgrep to. For individual users, this can also be a personal account.
Either select a **scan environment** or click **Don't want to connect to anything yet?**
If you selected a **scan environment**:
i. Follow the prompts to set up the scan.
If you clicked **Don't want to connect to anything yet**:
ii. Choose either **Skip setup** if you prefer not to scan anything yet or **See demo project** to view how Semgrep scans and presents findings from a demo `juice-shop` project.
You have successfully created an account, your first organization, and have optionally run your first scan.
## Set up organizations
Organizations (orgs) in Semgrep enable users to share access to, and management of, Semgrep resources such as findings and reports.
Semgrep organizations can be **connected** to equivalent GitHub, GitLab, and SSO organizations, which enables users from those organizations to easily join your Semgrep deployment through their existing credentials.
### Next steps for GitHub and GitLab users
* Connect your Semgrep org to your GitHub or GitLab SCM. Refer to [ Connect a source code manager](/deployment/connect-scm) for steps.
### Next steps for Bitbucket and Azure Repos users
* Connect your Semgrep org to your Bitbucket Data Center project or your Azure DevOps project. Refer to [ Connect a source code manager](/deployment/connect-scm) for steps.
* To add members to your Semgrep organization, set up [ SSO authentication](/deployment/sso).
* You can also opt to scan a repository instead.
## Appendices
**NOTE**
These sections are helpful, but are not necessary to set up a deployment.
### How Semgrep organizations work
Users can have more than one organization, and an organization can consist of one or many user accounts. Users must belong to at least one organization when they first sign in to Semgrep.
Organizations can be as small as a single user in a department, or encompass whole companies.
By default, orgs do not manage any authentication or repositories. You add resources and users to an org by connecting to an SCM or SSO, or setting up a Semgrep scan.
Once you have connected to your SSO or SCM, any team member from your GitHub, GitLab, or SSO organization can sign in to Semgrep. This includes developers not part of your security team. To control which resources they are able to see or what policies they can change, configure their **role** through [ user access control features](/deployment/teams/overview).
### Create additional orgs
After you create your first org, you can create multiple orgs to group related resources together:
In Semgrep AppSec Platform, click the drop-down box with your organization name, located at the navigation bar.
Click **Add org**.
Click **Create an organization**.
In the popup, provide an **Organization display name**.
### Organization setup examples
The following examples illustrate what a completed organizational set-up can look like.
#### Single-user organization in GitLab
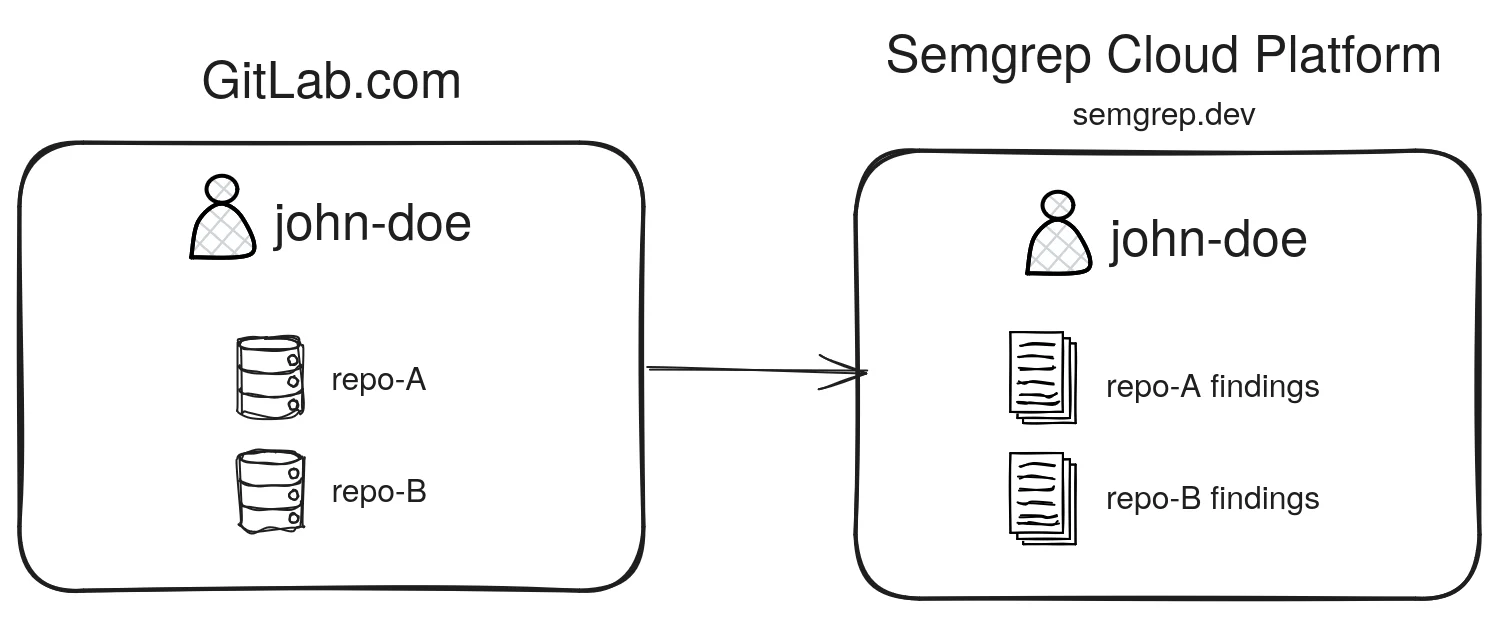
* In this example, a single GitLab user, `john-doe`, has a Semgrep org account with the same name.
* He has set up his CI workflow to scan `repo-A` and `repo-B` in his GitLab account. The CI job sends scan results (findings) to Semgrep AppSec Platform.
* This is similar to a **personal account** in GitHub or GitLab.
If you selected a **scan environment**:
i. Follow the prompts to set up the scan.
If you clicked **Don't want to connect to anything yet**:
i. Choose either **Skip setup** if you prefer not to scan anything yet or **See demo project** to view how Semgrep scans and presents findings from a demo `juice-shop` project.
To sign in using your GitLab account:
Navigate to the [ Semgrep AppSec Platform login page](https://semgrep.dev/login/) and click **Sign in with GitLab**.
Click **Authorize** to grant Semgrep the needed permissions and proceed.
Enter an **organization name** when prompted then click **Create new organization**. This organization name is typically the name of the org in GitLab that you want to connect Semgrep to. For individual users, this can also be a personal account.
Either select a **scan environment** or click **Don't want to connect to anything yet?**
If you selected a **scan environment**:
i. Follow the prompts to set up the scan.
If you clicked **Don't want to connect to anything yet**:
ii. Choose either **Skip setup** if you prefer not to scan anything yet or **See demo project** to view how Semgrep scans and presents findings from a demo `juice-shop` project.
You have successfully created an account, your first organization, and have optionally run your first scan.
## Set up organizations
Organizations (orgs) in Semgrep enable users to share access to, and management of, Semgrep resources such as findings and reports.
Semgrep organizations can be **connected** to equivalent GitHub, GitLab, and SSO organizations, which enables users from those organizations to easily join your Semgrep deployment through their existing credentials.
### Next steps for GitHub and GitLab users
* Connect your Semgrep org to your GitHub or GitLab SCM. Refer to [ Connect a source code manager](/deployment/connect-scm) for steps.
### Next steps for Bitbucket and Azure Repos users
* Connect your Semgrep org to your Bitbucket Data Center project or your Azure DevOps project. Refer to [ Connect a source code manager](/deployment/connect-scm) for steps.
* To add members to your Semgrep organization, set up [ SSO authentication](/deployment/sso).
* You can also opt to scan a repository instead.
## Appendices
**NOTE**
These sections are helpful, but are not necessary to set up a deployment.
### How Semgrep organizations work
Users can have more than one organization, and an organization can consist of one or many user accounts. Users must belong to at least one organization when they first sign in to Semgrep.
Organizations can be as small as a single user in a department, or encompass whole companies.
By default, orgs do not manage any authentication or repositories. You add resources and users to an org by connecting to an SCM or SSO, or setting up a Semgrep scan.
Once you have connected to your SSO or SCM, any team member from your GitHub, GitLab, or SSO organization can sign in to Semgrep. This includes developers not part of your security team. To control which resources they are able to see or what policies they can change, configure their **role** through [ user access control features](/deployment/teams/overview).
### Create additional orgs
After you create your first org, you can create multiple orgs to group related resources together:
In Semgrep AppSec Platform, click the drop-down box with your organization name, located at the navigation bar.
Click **Add org**.
Click **Create an organization**.
In the popup, provide an **Organization display name**.
### Organization setup examples
The following examples illustrate what a completed organizational set-up can look like.
#### Single-user organization in GitLab
* In this example, a single GitLab user, `john-doe`, has a Semgrep org account with the same name.
* He has set up his CI workflow to scan `repo-A` and `repo-B` in his GitLab account. The CI job sends scan results (findings) to Semgrep AppSec Platform.
* This is similar to a **personal account** in GitHub or GitLab.
 #### Enterprise org with SSO and multiple orgs in GitHub
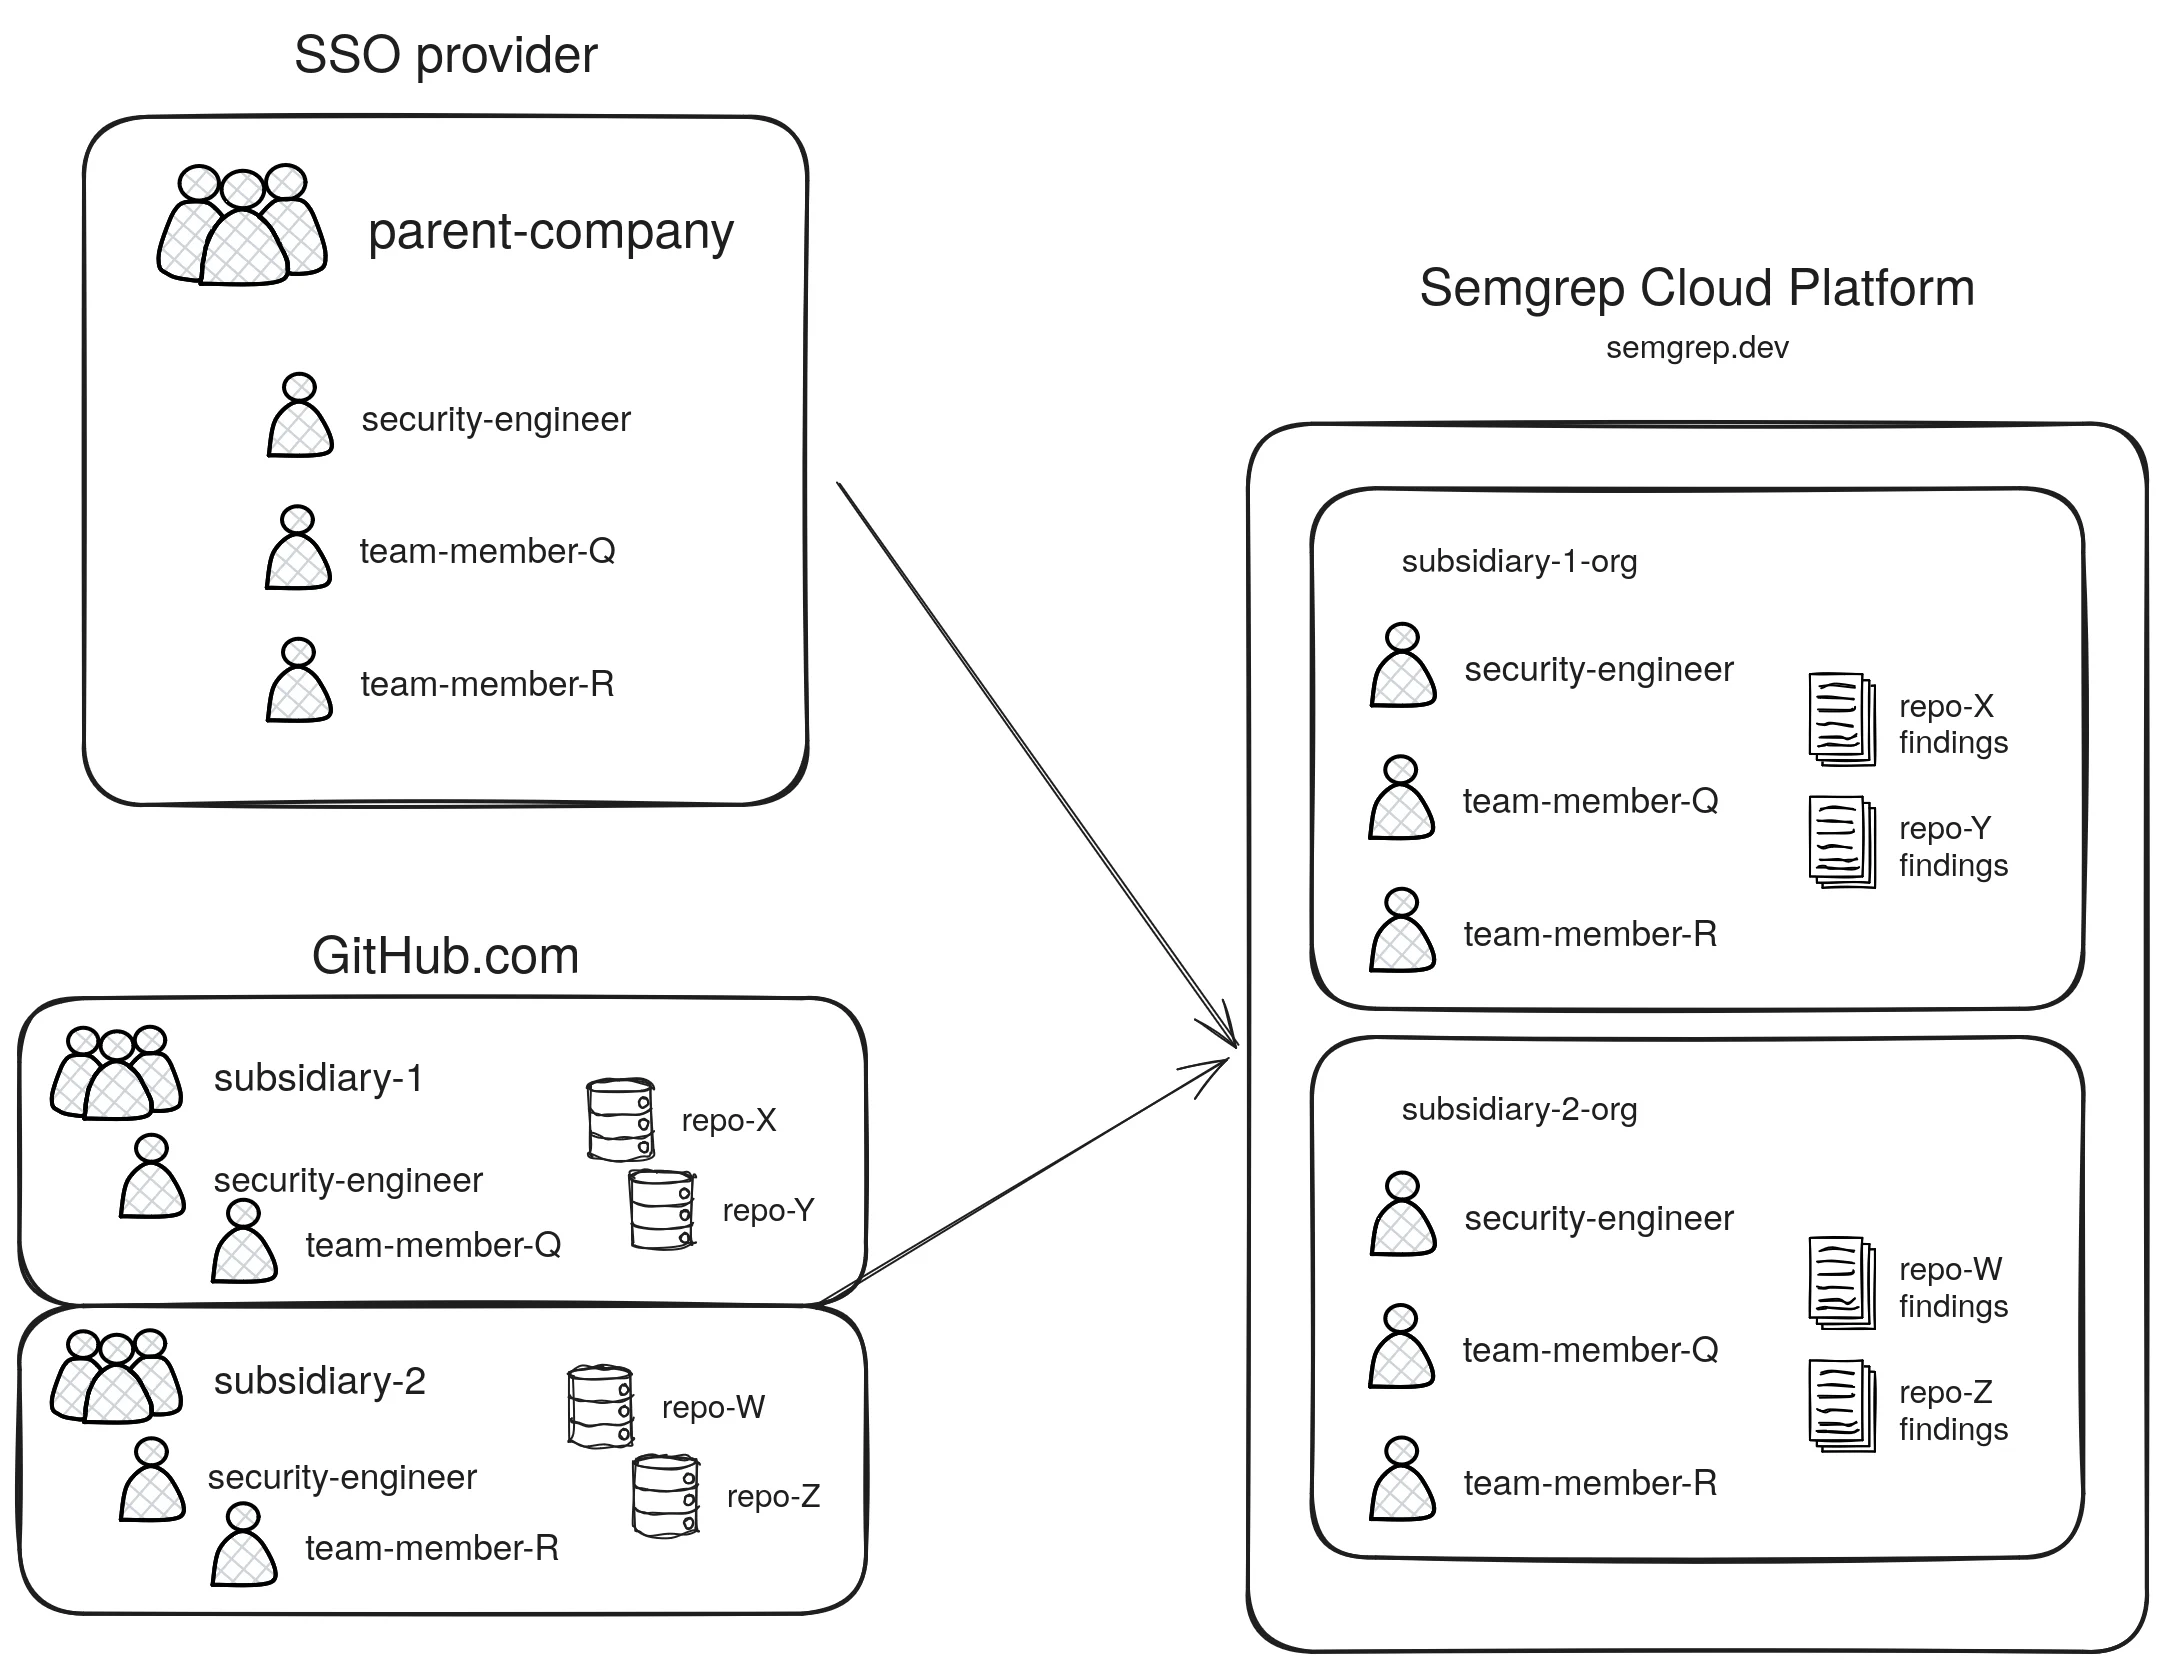
In this example, a `parent-company` has multiple `subsidiaries`, and wants to use SSO for user authentication:
* Each `subsidiary` is its own GitHub organization.
* The security team is responsible for all `subsidiaries` in `parent-company`. Thus, the security team is a part of all `subsidiaries`.
* The `parent-company` enforces SSO for all of its `subsidiaries`.
* Here, membership and repository scanning are separately managed by two different services.
The Semgrep deployment could look like this:
* Each GitHub org has a corresponding Semgrep org.
* The security team has configured SSO for each Semgrep org.
* This means that `team-member-R` can also access `subsidiary-1-org`. The resources they are able to view or change can be constrained through **roles**.
#### Enterprise org with SSO and multiple orgs in GitHub
In this example, a `parent-company` has multiple `subsidiaries`, and wants to use SSO for user authentication:
* Each `subsidiary` is its own GitHub organization.
* The security team is responsible for all `subsidiaries` in `parent-company`. Thus, the security team is a part of all `subsidiaries`.
* The `parent-company` enforces SSO for all of its `subsidiaries`.
* Here, membership and repository scanning are separately managed by two different services.
The Semgrep deployment could look like this:
* Each GitHub org has a corresponding Semgrep org.
* The security team has configured SSO for each Semgrep org.
* This means that `team-member-R` can also access `subsidiary-1-org`. The resources they are able to view or change can be constrained through **roles**.
 ### Join an existing org
Team members can join a Semgrep organization by logging in through the auth provider specified by your Semgrep admin:
To join an existing org using your GitHub or GitLab credentials:
Sign in to [ Semgrep AppSec Platform](https://semgrep.dev/login) with the account credentials specified by your admin.
Follow the on-screen prompts to grant Semgrep the needed permissions and proceed. This creates your **personal** Semgrep account.
Click the organization name displayed at the top of the **navigation bar** to expand the drop-down menu.
Click **Add org > Join an organization**.
Provide the name of the organization you'd like to join. Then, click **Join**.
To join an existing org through your SSO provider:
Sign in to [ Semgrep AppSec Platform](https://semgrep.dev/login) with the account credentials specified by your admin.
You are automatically signed in to all organizations that your admin has set up for you.
**TIP**
Semgrep admins can also [send developers invites to join their Semgrep org](/deployment/teams/manage#invite-a-user-through-email).
### Delete an existing org
Reach out to [Support](/support) to delete an organization.
### Join an existing org
Team members can join a Semgrep organization by logging in through the auth provider specified by your Semgrep admin:
To join an existing org using your GitHub or GitLab credentials:
Sign in to [ Semgrep AppSec Platform](https://semgrep.dev/login) with the account credentials specified by your admin.
Follow the on-screen prompts to grant Semgrep the needed permissions and proceed. This creates your **personal** Semgrep account.
Click the organization name displayed at the top of the **navigation bar** to expand the drop-down menu.
Click **Add org > Join an organization**.
Provide the name of the organization you'd like to join. Then, click **Join**.
To join an existing org through your SSO provider:
Sign in to [ Semgrep AppSec Platform](https://semgrep.dev/login) with the account credentials specified by your admin.
You are automatically signed in to all organizations that your admin has set up for you.
**TIP**
Semgrep admins can also [send developers invites to join their Semgrep org](/deployment/teams/manage#invite-a-user-through-email).
### Delete an existing org
Reach out to [Support](/support) to delete an organization.