> ## Documentation Index
> Fetch the complete documentation index at: https://docs.semgrep.dev/llms.txt
> Use this file to discover all available pages before exploring further.
# Enable Bitbucket Cloud pull request comments
**YOUR DEPLOYMENT JOURNEY**
* You have gained the necessary [resource access and permissions](/deployment/checklist) required for deployment.
* You have [created a Semgrep account and organization](/deployment/create-account-and-orgs).
* You have [connected your source code manager](/deployment/connect-scm).
* Optionally, you have [set up SSO](/deployment/sso).
* You have successfully added a [Semgrep job](/deployment/add-semgrep-to-ci) to your CI workflow with [diff-aware scanning](/deployment/customize-ci-jobs/#set-up-diff-aware-scans).
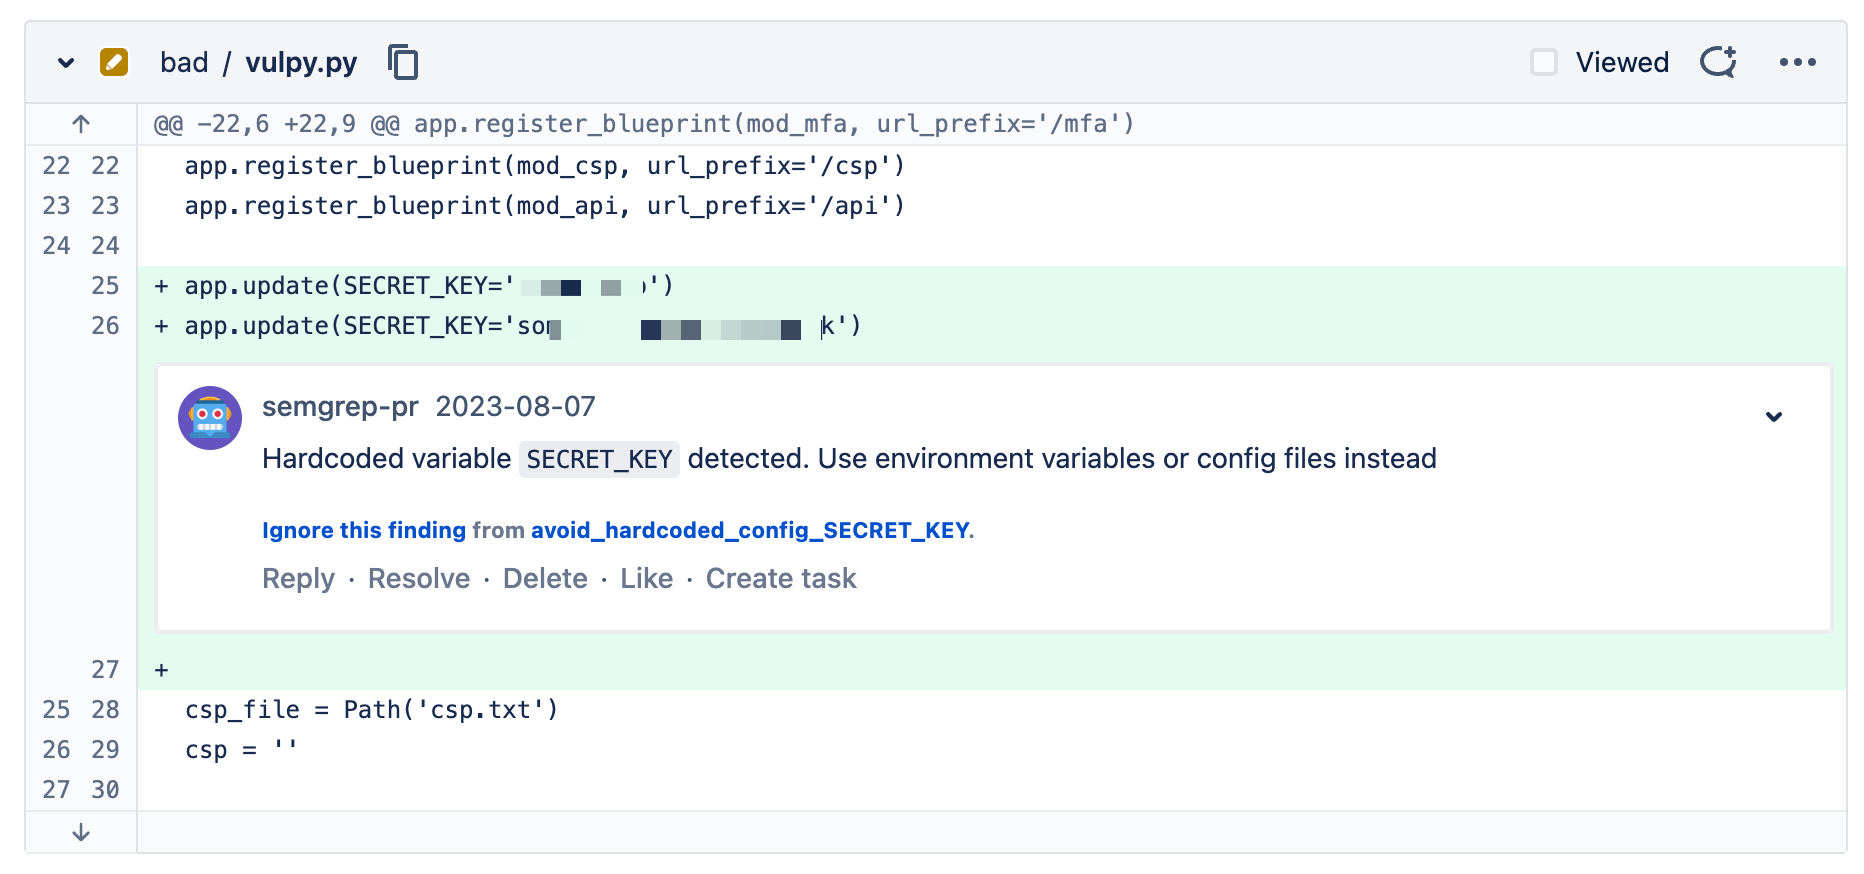
Semgrep can create **pull request (PR) comments** in your Bitbucket repository. These comments provide a description of the issue detected by Semgrep and may offer possible solutions. These comments are a means for security teams, or any team responsible for creating standards to help their fellow developers write safe and standards-compliant code.
Automated comments on Bitbucket pull requests are displayed as follows:
 ## Conditions for PR comment creation
PR comments appear for the following types of scans under these conditions:
| Type of scan | Product name | Trigger condition | How to set up |
| :----------------------------------------- | :------------------------- | :---------------------------------------------------------------------------------------------------------------------------------------------------------------------------------------------------------------- | :-------------------------------------------------------------------------------------------------------------------------------------------------------------------------------------------------------------------------------------------------------------------------------------------------------------------------------------------------------- |
| Static application security testing (SAST) | Semgrep Code | A comment appears when a finding is generated by a rule in **Comment or Block mode**. This means you can fully customize what comments your developers receive. | Complete the steps in the following sections:
## Conditions for PR comment creation
PR comments appear for the following types of scans under these conditions:
| Type of scan | Product name | Trigger condition | How to set up |
| :----------------------------------------- | :------------------------- | :---------------------------------------------------------------------------------------------------------------------------------------------------------------------------------------------------------------- | :-------------------------------------------------------------------------------------------------------------------------------------------------------------------------------------------------------------------------------------------------------------------------------------------------------------------------------------------------------- |
| Static application security testing (SAST) | Semgrep Code | A comment appears when a finding is generated by a rule in **Comment or Block mode**. This means you can fully customize what comments your developers receive. | Complete the steps in the following sections:
1. [Confirm your Semgrep account's connection and access to your source code manager](#confirm-your-semgrep-accounts-connection).
2. [Configure comments for Semgrep Code](#configure-comments-for-semgrep-code). |
| Software composition analysis (SCA) | Semgrep Supply Chain (SSC) | A comment appears based on the conditions you explicitly set in a [Supply Chain policy](/semgrep-supply-chain/policies) or when Semgrep detects a [license violation](/semgrep-supply-chain/license-compliance). | To receive Supply Chain comments, complete the steps in [Confirm account connection and access](#confirm-your-semgrep-accounts-connection) and [set up a policy](/semgrep-supply-chain/policies).
To receive license violation comments, [enable dependency search](/semgrep-supply-chain/dependency-search#enable-and-use-dependency-search). |
| Secrets | Semgrep Secrets | A comment appears when a finding is generated by a rule in **Comment or Block mode**. A comment also appears for invalid findings and validation errors if these conditions are set to **Comment or Block mode**. | Complete the steps in the following sections:
1. [Confirm your Semgrep account's connection and access to your source code manager](#confirm-your-semgrep-accounts-connection).
2. [Configure comments for Semgrep Secrets](#configure-comments-for-semgrep-secrets). |
Comments from Supply Chain scans include the following information:
**Risk**
A description of the vulnerability, including the types of attack it is vulnerable to.
**Fix**
Indicates what versions to upgrade to, if any, that resolves or eliminates the vulnerability.
**Reference**
A link to additional information about the vulnerability from its source, such as the [GitHub Advisory Database](https://github.com/advisories) and the [National Vulnerability Database (NVD)](https://nvd.nist.gov/vuln), if available.
## Supported Bitbucket plans
* Any of the following Bitbucket plans are supported:
* Cloud Free
* Standard
* Premium
There are two ways in which you can integrate Semgrep comments into Bitbucket depending on the Bitbucket plan you use:
* **Workspace access token**: If you use the Bitbucket Cloud Premium plan, you can create a workspace access token. This option saves time because you can create one access token for all repositories in the workspace. With one workspace access token, you can bulk-onboard more repositories at once from a whole workspace. However, you can also use the option of a repository access token to onboard repositories one by one.
* **Repository access token**: If you do **not** have the Bitbucket Cloud Premium plan, create a separate repository access token for each repository where you want to use Semgrep. This configuration option is also useful if you have the Bitbucket Cloud Premium plan, but prefer to onboard repositories one by one instead of bulk onboarding.
## Create and add a workspace access token
**PREREQUISITE**
* **Bitbucket Cloud Premium** plan. If you do not have a Bitbucket Cloud Premium plan, create a repository access token.
Create a workspace access token in Bitbucket (only available if you have a Bitbucket Cloud Premium plan):
Create a workspace access token in Bitbucket with **Read** and **Write** permissions for the **Pull requests** scope. Follow the instructions in [Create a workspace Access Token](https://support.atlassian.com/bitbucket-cloud/create-a-workspace-access-token/) in Bitbucket documentation.
Add the workspace access token as a workspace variable with the **Secured** option.
Continue setting up Bitbucket PR comments by finishing the rest of this guide.
## Create and add a repository access token
**INFO**
This section helps you to configure PR comments if you do **not** have a Bitbucket Cloud Premium plan. You can create a separate repository access token for each repository where you want to use Semgrep. This configuration option is also useful if you have the Bitbucket Cloud Premium plan, but prefer to onboard repositories one by one instead of bulk onboarding.
Fulfill these general steps to create a repository access token:
Create a repository access token in Bitbucket with **Read**, and **Write** permissions for the **Pull requests** scope. Follow the instructions in [Create a repository Access Token](https://support.atlassian.com/bitbucket-cloud/create-a-repository-access-token/) in Bitbucket documentation.
Add the repository access token as a repository variable with the **Secured** option.
Continue setting up Bitbucket PR comments by finishing the rest of this guide.
## Enable PR comments in Bitbucket
### Prerequisites
* In addition to finishing the previous steps in your deployment journey, it is recommended to have completed a **full scan** on your **default branch** for the repository in which you want to receive comments.
* You must have a Bitbucket Cloud **workspace access token** or a **repository access token**.
### Confirm your Semgrep account's connection
Confirm that you have the correct connection and access:
In your Semgrep AppSec Platform account, click **Settings > Source code managers**.
Check that an entry for your Bitbucket workspace exists and is correct.
#### Triage through PR comments
Developers can triage Semgrep findings without leaving Bitbucket by responding to the PR comments authored by Semgrep. To use this feature, you must have a paid Bitbucket Cloud plan, and must update your source code manager (SCM) connection to use a workspace access token. This allows you to enable webhooks, which Semgrep requires for the triage through PR comments feature.
To update your connection between Semgrep and Bitbucket:
Log in to Bitbucket using an account assigned with the **Product Admin** role.
[Create a workspace access token](https://support.atlassian.com/bitbucket-cloud/workspace-access-tokens/). Ensure that you assign the following scopes to the token:
* `webhook (read and write)`
* `repository (read and write)`
* `pullrequest (read and write)`
* `project (admin)`
* `account (read)`
Return to Semgrep and [ sign in](https://semgrep.dev/login).
Go to ** Settings > Source code managers**, and find your Bitbucket connection.
Click **Update access token**.
In the **Update access token** dialog that appears, provide the new token you created. Click **Update** to save and proceed.
Toggle the **Incoming webhooks** setting on.
Once you've successfully enabled webhooks and the **Triage via code review comments** toggle is on, developers can triage Semgrep findings from Bitbucket Cloud.
### Set up the configuration file
The logic to determine whether Semgrep runs a full scan or a diff-aware scan on a pull request is defined in the `bitbucket-pipelines.yml` file.
For PR comments and accurate diff-aware scan analysis to work, you must set `SEMGREP_BASELINE_REF`, which defines the repository’s default branch used as the comparison baseline, such as `main` or `master`. Specifying the default branch helps Semgrep understand the differences between the current branch and the main line of development and to generate meaningful results and PR comments.
```bash theme={null}
image: semgrep/semgrep:latest
pipelines:
branches:
# Change to your default branch if different from main
main:
- step:
name: Semgrep scan on push
script:
- export SEMGREP_APP_TOKEN=$SEMGREP_APP_TOKEN
- semgrep ci
pull-requests:
'**': # This applies to pull requests for all branches
- step:
name: Semgrep scan on PR
script:
- export SEMGREP_APP_TOKEN=$SEMGREP_APP_TOKEN
# Change to your default branch if different from main
- export SEMGREP_BASELINE_REF="origin/main"
- git fetch origin "+refs/heads/*:refs/remotes/origin/*"
- semgrep ci
custom:
# Trigger job manually. For cron in Bitbucket, see: https://support.atlassian.com/bitbucket-cloud/pipeline-triggers/#On-schedule
semgrep-manual:
- step:
name: Semgrep manual scan
script:
- export SEMGREP_APP_TOKEN=$SEMGREP_APP_TOKEN
- semgrep ci
```
### Configure comments for Semgrep Code
In addition to setting up the connection between Semgrep and Bitbucket, you must assign rules to Comment or Block mode. This customization enables you to:
* Manage the amount of PR comments your developers receive.
* Ensure that only rules that meet your criteria, such as high severity or high confidence rules, produce comments visible to developers, reducing noise.
#### Set rules to Comment or Block mode
The following instructions let you customize what findings or security issues your developers see as comments in their PRs:
In your Semgrep AppSec Platform account, click **Rules > Policies** to enter the **Policies** page. Under **Modes **, you can quickly see if you have existing rules in either Comment or Block mode.
Optional: To configure Semgrep Secrets rules, click the **Secrets** tab.
Optional: Use the filters to quickly find rules to set to Comment or Block.
Click the ** checkbox** of the rules you want to set. You can use Ctrl + Click to select rules in bulk.
Click **Change modes**.
Click either **Block** or **Comment**.
You have successfully configured PR comments for Semgrep Code.
**TIP**
Rules in Block mode fail the CI job that runs on the PR. Depending on your workflow, this may prevent your PR from merging.
### Configure comments for Semgrep Secrets
In addition to setting up the connection between Semgrep and Bitbucket, you must assign rules to Comment or Block mode. This customization enables you to:
* Manage the amount of PR comments your developers receive.
* Ensure that only rules that meet your criteria, such as high severity or high confidence rules, and result in findings involving valid secrets produce comments visible to developers, reducing noise.
#### Set rules to Comment or Block mode
The following instructions let you customize what findings or security issues your developers see as comments in their PRs:
In Semgrep AppSec Platform, go to **Rules > Policies > Secrets**.
Under **Modes **, you can see if you have existing rules in either Comment or Block mode. You can also use the filters to find rules you want to set to Comment or Block.
Click the ** checkbox** of the rules you want to set. You can use Ctrl + Click to select rules in bulk.
Click **Change modes**.
Click either **Block** or **Comment**.
You have successfully configured PR comments for Semgrep Secrets.
#### Validation state policies
Validation state policies allow you to define how Semgrep handles the following issues:
* **Invalid findings**: the secret has been revoked, was never functional, or used for a custom or private endpoint that Semgrep can't communicate with. For example, a Semgrep rule that tests GitHub credentials may return an invalid finding if Semgrep can't communicate with an on-premise deployment.
* **Validation errors**: Semgrep was unable to reach the secrets provider to test the validity of the credential, or Semgrep received an unexpected response from the API
To edit the policy for invalid secrets and errors:
In Semgrep AppSec Platform, go to **Rules > Policies > Secrets**.
Click **Validation State Policies**.
Choose the mode, either Comment or Block, that you want Semgrep to set for **Invalid findings**.
Choose the mode, either Comment or Block, that you want Semgrep to set for **Validation errors**.
**TIP**
Rules in Block mode fail the CI job that runs on the PR. Depending on your workflow, this may prevent your PR from merging.
### Configure comments for Semgrep Supply Chain
To configure comments for Supply Chain, you must define a Supply Chain policy. This policy lets you set the specific conditions, such as transitivity and reachability, that trigger a comment. These conditions are unique to Supply Chain findings.
See the [Policies documentation](/semgrep-supply-chain/policies) for more information.
### Receive comments in an access-controlled Bitbucket account
Bitbucket Premium provides [ access control features](https://support.atlassian.com/bitbucket-cloud/control-access-to-your-private-content/) for content that your individual account owns. If you use this feature, you need to add several IP addresses into your allowlist.
If you are behind a firewall, are using a virtual private network (VPN), or have network restrictions regarding access, you may need to add the following IP addresses to the **ingress** allowlist and **egress** allowlist:
```bash theme={null}
# Ingress IP addresses (from Semgrep to your infrastructure)
# and egress IP addresses (from your infrastructure to Semgrep)
35.166.231.235
52.35.248.246
52.34.137.110
44.225.64.41
```
#### Additional egress IP addresses
You must also add **CloudFront IP addresses** to your **egress** allowlist. Refer to [ Locations and IP address ranges of CloudFront edge servers](https://docs.aws.amazon.com/AmazonCloudFront/latest/DeveloperGuide/LocationsOfEdgeServers.html) for a list of IP addresses.
#### Test your configuration
Test that you are able to receive findings by manually triggering a scan through your CI provider.
Receiving PR or MR comments may require additional steps depending on the custom configuration of your VPN or SCM (for example, if you use a static IP without a hostname). Reach out to [Semgrep Support](/support) with any concerns.
**INFO**
Only rules set to the **Comment** and **Block** rule modes in the [Policies page](https://semgrep.dev/orgs/-/policies) create PR comments.
## Optional features
### Customize PR comments
You can customize the comments Semgrep leaves on your PR. Custom comments allow you to direct your teams to the resources they need to handle the vulnerabilities Semgrep identifies in their code.
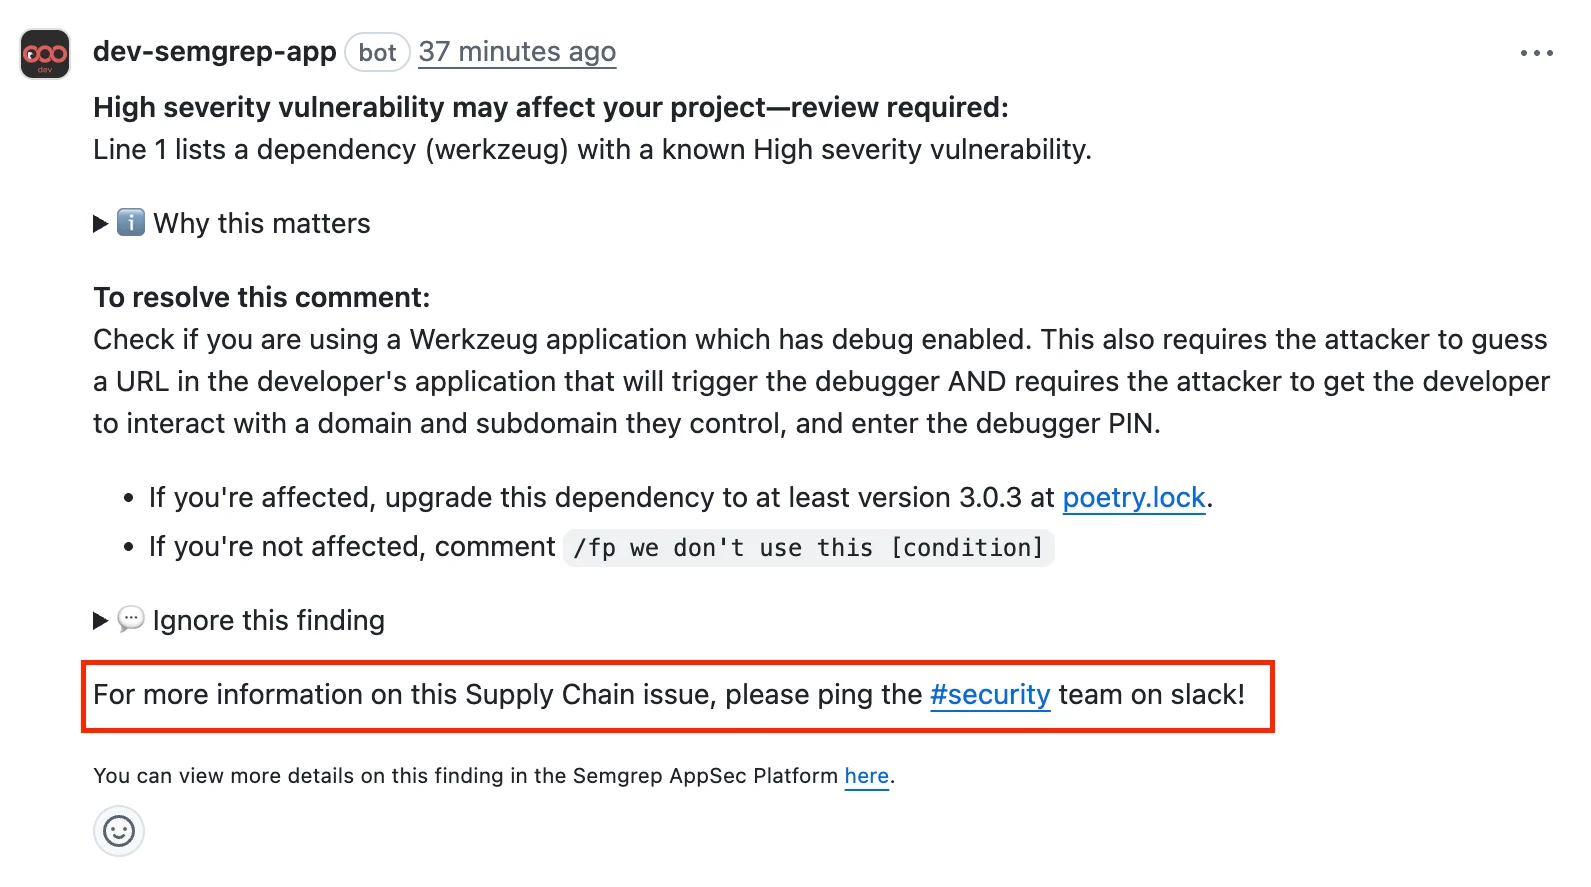 To provide custom PR comments:
Sign in to [ Semgrep AppSec Platform](https://semgrep.dev/login?).
Navigate to **Settings > General > Global**.
Go to the **Custom PR/MR comments footers** section.
To provide custom PR comments:
Sign in to [ Semgrep AppSec Platform](https://semgrep.dev/login?).
Navigate to **Settings > General > Global**.
Go to the **Custom PR/MR comments footers** section.
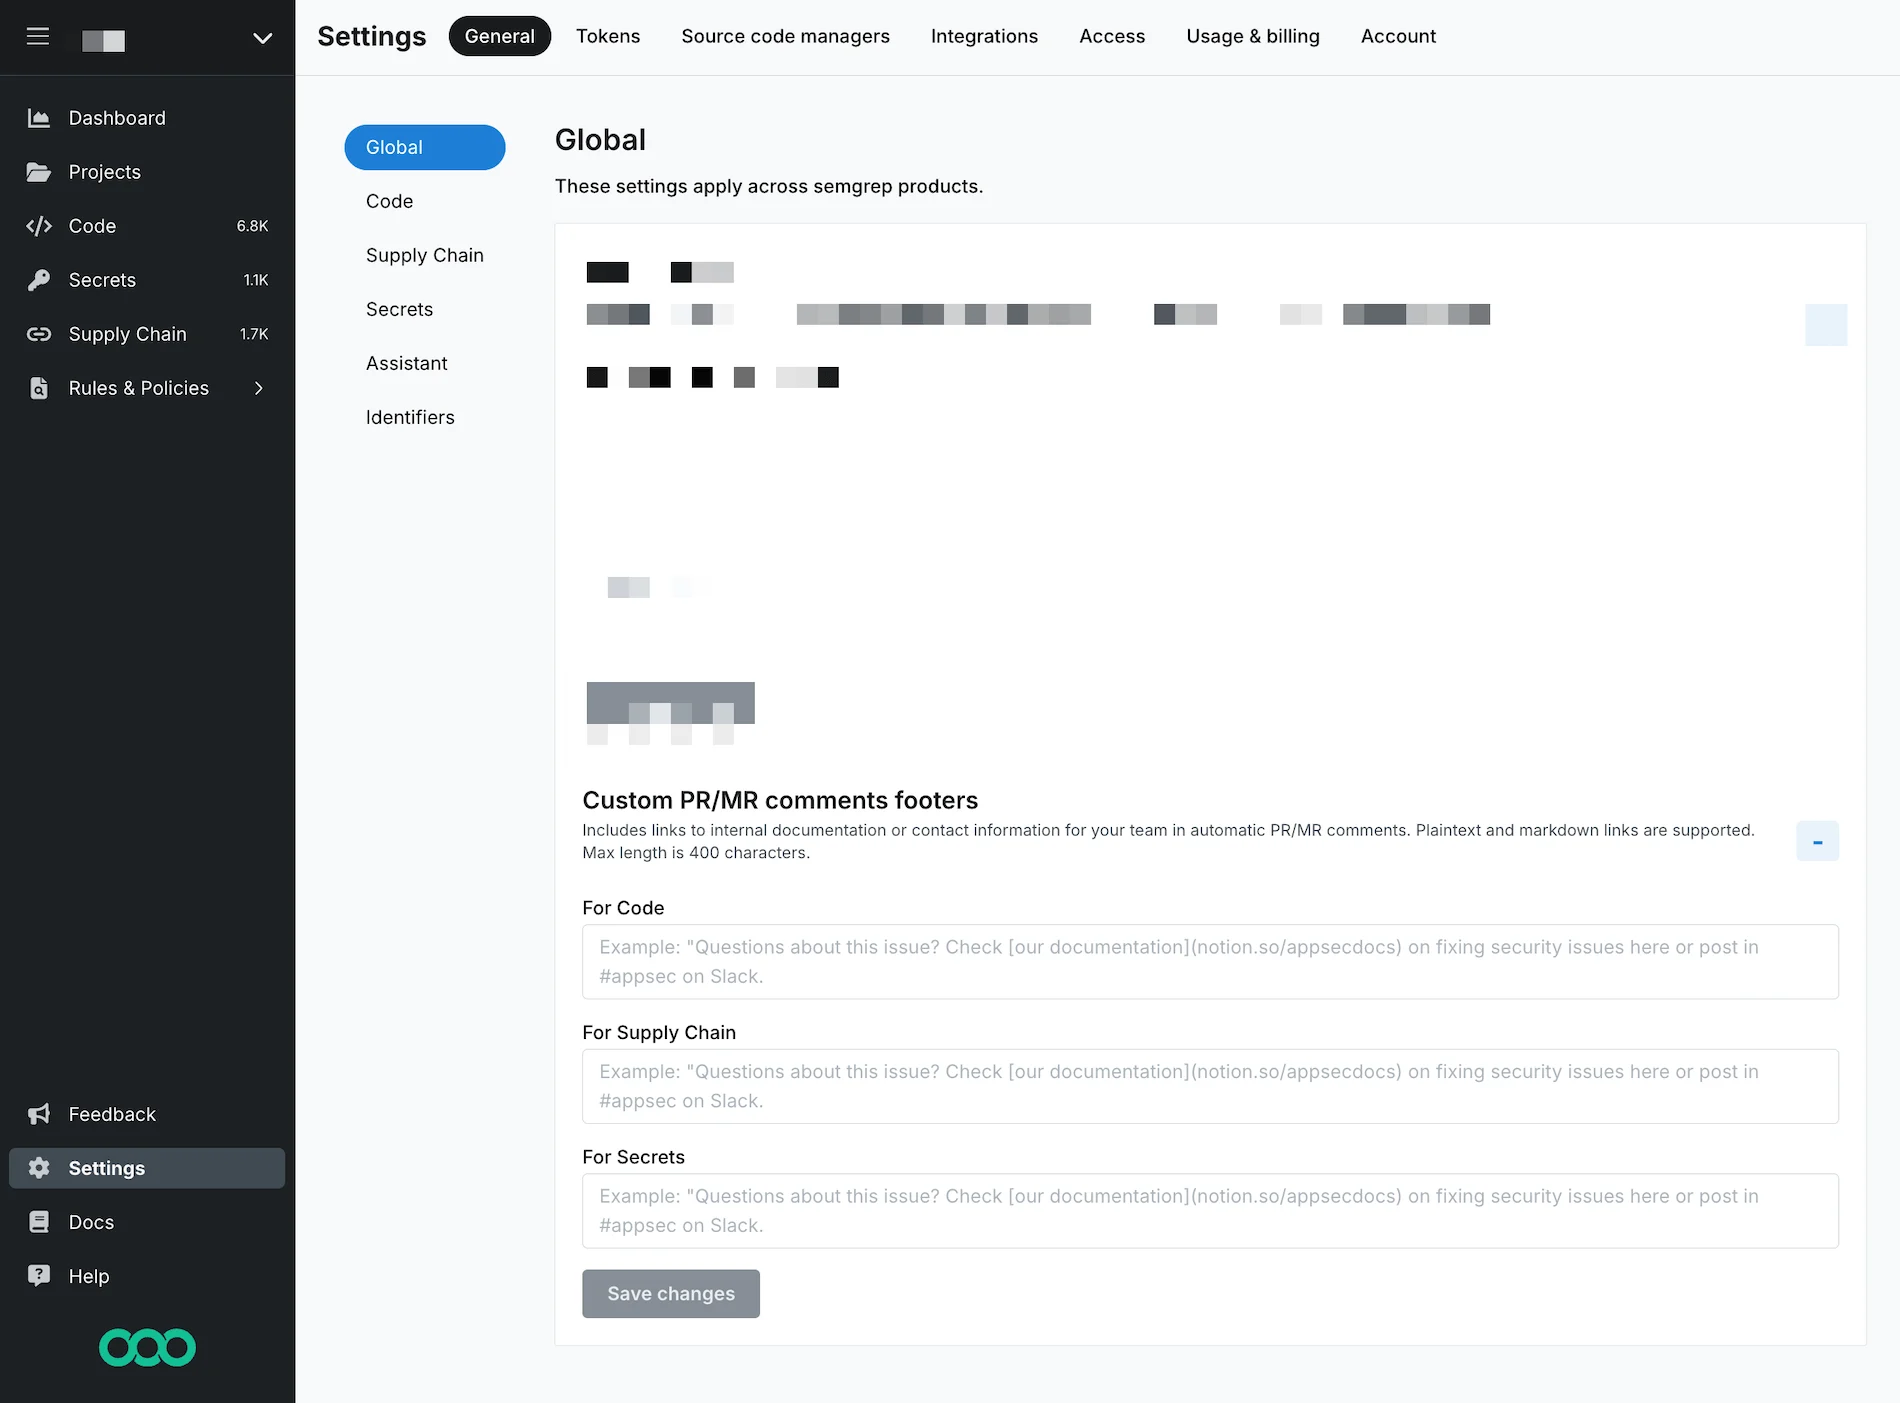 Provide a custom comment for each Semgrep product whose findings you want to generate a PR comment. Semgrep supports Markdown and plaintext links in your message.
Click **Save changes**.
### Enable Rule-defined fix in Bitbucket Cloud repositories
[Autofix](/writing-rules/rule-defined-fix) is a Semgrep feature in which rules contain suggested fixes to resolve findings.
To enable **Rule-defined fix** for all projects in your Semgrep AppSec Platform organization, follow these steps:
In Semgrep AppSec Platform, go to **Settings > General > Code**.
Use the **Rule-defined fix ** toggle to enable this feature.
## Next steps
You've finished setting up a core deployment of Semgrep 🎉.
* Explore recommended tasks after deployment in [ Beyond core deployment](/deployment/beyond-core-deployment).
## Additional references
Provide a custom comment for each Semgrep product whose findings you want to generate a PR comment. Semgrep supports Markdown and plaintext links in your message.
Click **Save changes**.
### Enable Rule-defined fix in Bitbucket Cloud repositories
[Autofix](/writing-rules/rule-defined-fix) is a Semgrep feature in which rules contain suggested fixes to resolve findings.
To enable **Rule-defined fix** for all projects in your Semgrep AppSec Platform organization, follow these steps:
In Semgrep AppSec Platform, go to **Settings > General > Code**.
Use the **Rule-defined fix ** toggle to enable this feature.
## Next steps
You've finished setting up a core deployment of Semgrep 🎉.
* Explore recommended tasks after deployment in [ Beyond core deployment](/deployment/beyond-core-deployment).
## Additional references