Prerequisites and permissions
- Semgrep Managed Scans require repositories hosted by Azure DevOps Services. Azure DevOps Server is not supported.
- Semgrep recommends setting up and configuring Semgrep Managed Scans with an Azure DevOps service account, not a personal account. Regardless of whether you use a personal or service account, the account must be assigned the Owner or Project Collection Administrator role for the organization.
- During setup and configuration, you must provide a personal access token generated by the account. This token must be authorized with Full access.
- Once you have Managed Scans fully configured, you can add restrictions to the token provided to Semgrep. The scopes you must assign to the token include:
Code: ReadCode: StatusMember Entitlement Management: ReadProject and Team: Read & writePull Request Threads: Read & write
- Once you have Managed Scans fully configured, you can add restrictions to the token provided to Semgrep. The scopes you must assign to the token include:
Enable Managed Scans and scan your first repository
1
In Semgrep AppSec Platform, click Projects.
2
Click Scan new project > Semgrep Managed Scan.
3
Select Azure Devops as your source code manager.
4
On the Add to Azure DevOps Pipeline page, provide the following information:
i. Your Access token. See User personal access tokens for token generation information. Ensure you set the Azure DevOps SCM name to
ii. The name of your Azure DevOps Project.
i. Your Access token. See User personal access tokens for token generation information. Ensure you set the Azure DevOps SCM name to
organization_name/project_name.ii. The name of your Azure DevOps Project.
5
Click Connect to proceed.
- After enabling Managed Scans, Semgrep performs a full scan on all the repositories in batches.
- Once a repository has been added to Semgrep AppSec Platform, it becomes a project. A Semgrep AppSec Platform project includes all the repository’s findings, history, and scan metadata.
- Projects with a Managed Scan configuration are tagged with
managed-scan, regardless of whether the project is actively being scanned by Semgrep Managed Scans or not. The Projects list also contains pending scans and scans that never started.
Add additional Azure DevOps projects
You can enable Semgrep Managed Scans for additional repositories after onboarding using the following steps:1
In Semgrep AppSec Platform, click Projects.
2
Click Scan new project > Semgrep Managed Scan.
3
On the Enable Managed Scans for repos page, select the repositories you want to add to Semgrep Managed Scans.
i. Optional: If you don’t see the repository you want to add, click Sync projects.
i. Optional: If you don’t see the repository you want to add, click Sync projects.
4
Select the repositories you want to scan from the list.
5
Click Enable Managed Scans. The Enable Managed Scans dialog appears. By default, Semgrep runs both full and diff-aware scans.
6
Optional: Disable PR or MR diff-aware scans by turning off the Enable PR/MR scans toggle.
7
Click Enable.
If the page doesn’t display any repositories
1
In Semgrep AppSec Platform, click Projects.
2
If the page doesn’t display the repository you want to add, click Sync projects.
3
If the page doesn’t display any repositories, click Sync projects.
4
Optional: Perform a hard refresh (Ctrl+F5 or Cmd+Shift+R).
Convert or migrate an existing Semgrep CI job
You can immediately add any existing project to Managed Scans.1
Follow the steps in Add additional Azure DevOps projects.
2
Delete the existing pipeline configuration file in your repository if appropriate.
Scan management and configuration
Manually run a full scan
1
In Semgrep AppSec Platform, click Projects.
2
Search for your repository’s name.
3
Click the gear icon to access the settings page for that repository.
4
Click Run a new scan > Rule-based detection.
You can manually run a full scan for both primary and non-primary branches.
Re-run a failed scan or a scan that never finished
1
In Semgrep AppSec Platform, click Projects.
2
Click on the project name.
3
Find the scan that failed or never finished using the Status column, and click Details to open the Scan logs dialog.
4
Ensure that you’re on the Overview tab of the Scan logs dialog, then click Retry scan.
Disable diff-aware scans on PRs
1
In Semgrep AppSec Platform, click Projects.
2
Search for your repository’s name.
3
Click the window icon under Details to access the settings page for that repository.
4
Click the toggle for diff-aware scans.
Delete a project
1
In Semgrep AppSec Platform, click Projects.
2
Search for your repository’s name.
3
Click the window icon under Details to access the settings page for that repository.
4
Click the dropdown at the header and click Delete project.
1
In Semgrep AppSec Platform, click Projects.
2
Switch to the Not Scanning tab of the Projects page.
3
Select the checkbox to Show archived projects.
4
Search for the archived repository’s name.
5
Click the window icon under Details to access the settings page for that repository.
6
Click the dropdown at the header and click Delete project.
Configure fail open to prevent diff-aware scans from blocking pull requests and merge requests
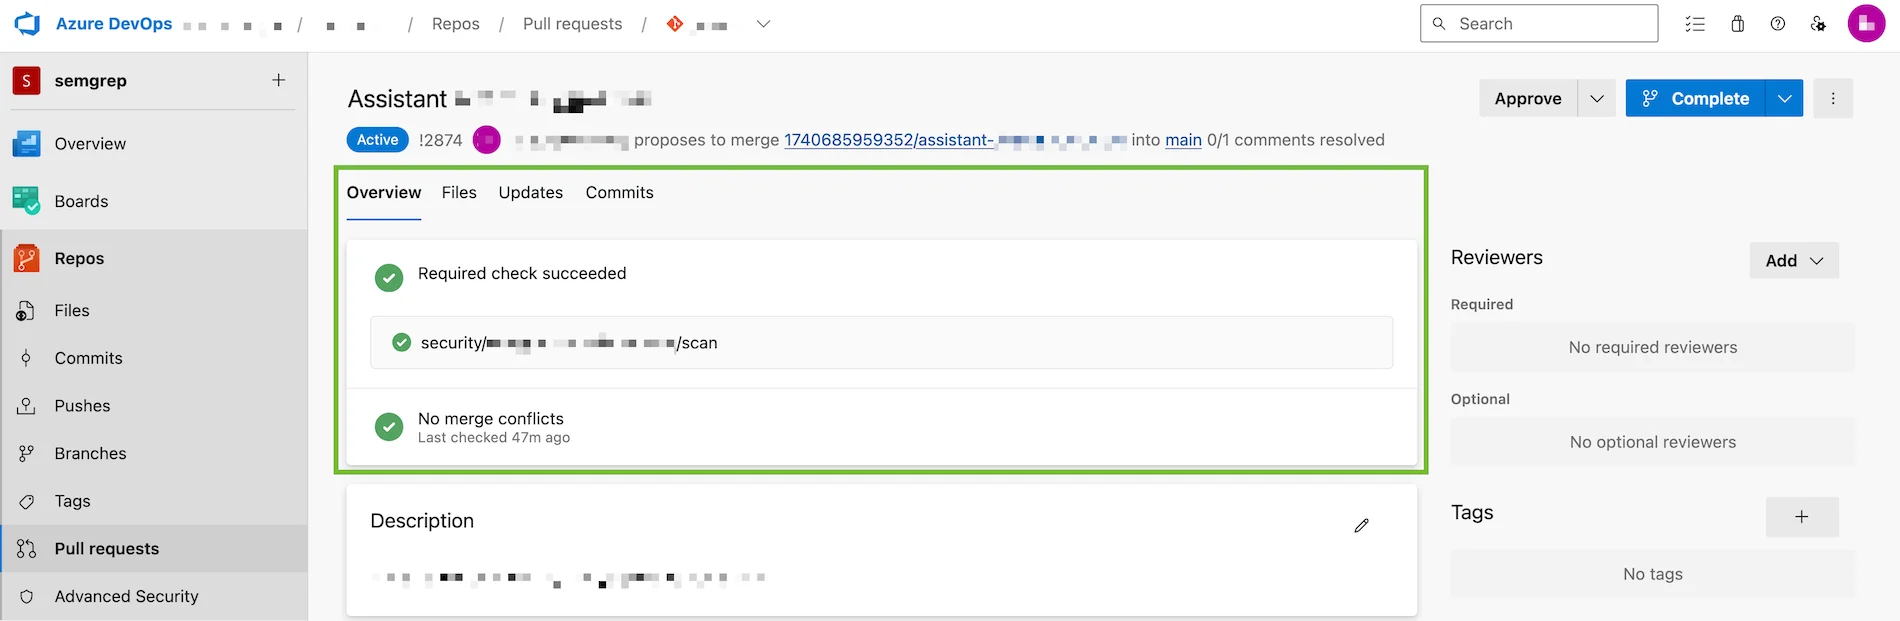
By default, diff-aware managed scans are set to fail open if a scan errors out or takes too long. This means that diff-aware scans are marked as successful on the pull request (PR) or merge request (MR), even if they haven’t completed after the specified timeout, allowing you to make the Semgrep status check required in your source code manager (SCM) while not blocking someone from merging a PR or MR if the check encounters an unexpected issue or takes too long.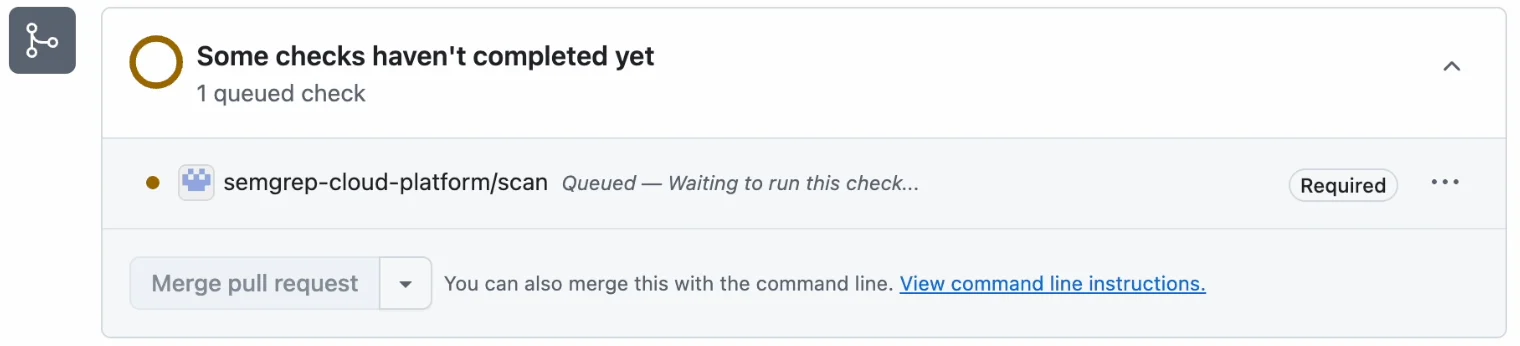
How fail open works
1
If enabled, the fail open feature is triggered whenever you open a PR or MR.
2
Initially, Semgrep sends an update to mark the PR or MR as
pending.3
Once the diff-aware scan begins, the PR or MR is updated to a status of
running.4
The diff-aware scan completes, and the PR or MR is updated to a status of
succeeded or failed.5
If the diff-aware scan is in
pending or running status longer than the configured timeout, then the fail open process updates the PR or MR to display a status of succeeded. This prevents the Semgrep scan from blocking the developer from merging their changes.succeeded, you can merge the PR or MR without waiting for the diff-aware scan to complete. However, if the PR or MR is still open and the scan completes after the fail open timeout is reached, Semgrep can still report the findings and mark the status as failed.
Configure fail open
By default, fail open is enabled. However, you can disable this feature and adjust the timeout value:1
Sign in to Semgrep AppSec Platform.
2
Go to Settings > General > Managed Scans.
3
Click the Fail open toggle to turn off this feature.
4
Set the Timeout value in minutes. The default value is 10 minutes, the minimum value is 1 minute, and the maximum value is 60 minutes.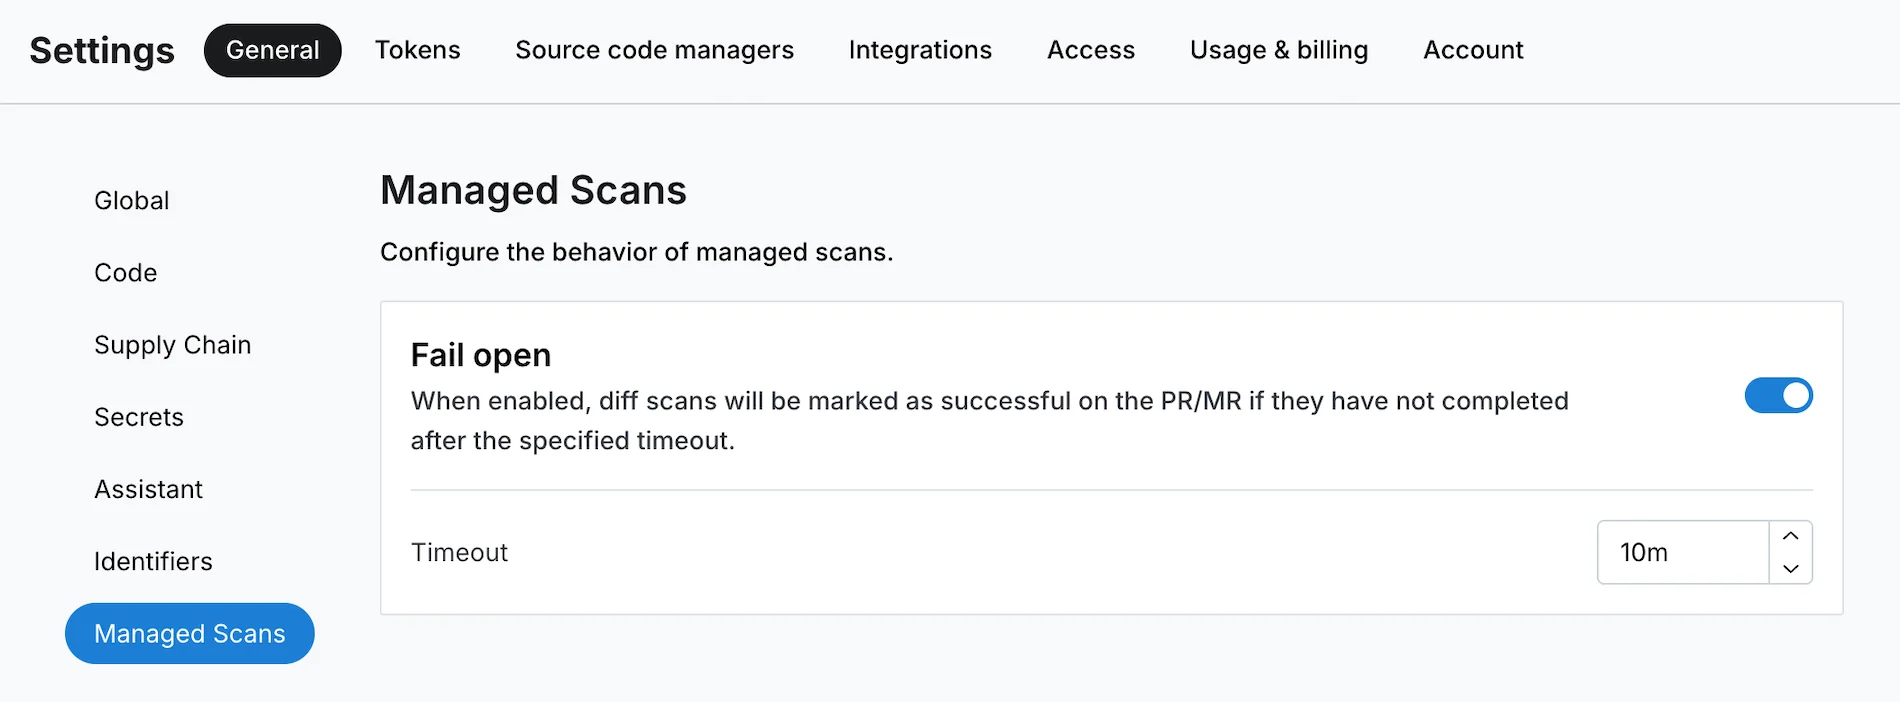
Disable webhooks
Managed Scans of Azure DevOps projects require webhooks. The webhooks are enabled by default when you add Azure DevOps as a source code manager when setting up Managed Scans. Webhooks are required for diff-aware scans and triaging by PR or MR comments. You can turn off webhooks at any time by following these steps:1
In Semgrep AppSec Platform, go to Settings > Source code managers.
2
Find your Azure DevOps connection, and click the toggle to turn off Incoming webhooks.
Revoke Semgrep’s access to your repositories
The following steps revoke the code access you previously granted Semgrep for all repositories you selected.1
In Semgrep AppSec Platform, click Settings > Source Code Managers.
2
Find the Azure DevOps entry on the list of Source code managers and click Remove.
3
Click Remove to confirm.
Turn off Managed Scans for specific repositories in Semgrep AppSec Platform
1
Sign in to Semgrep AppSec Platform.
2
Go to Projects and find the project you no longer want scanned with Semgrep Managed Scanning. Click the project’s Details page > Settings tab.
3
Toggle the switch for Managed diff scans to turn off scans of new pull requests and merge requests and Managed full scans to turn off full scans of the base branch.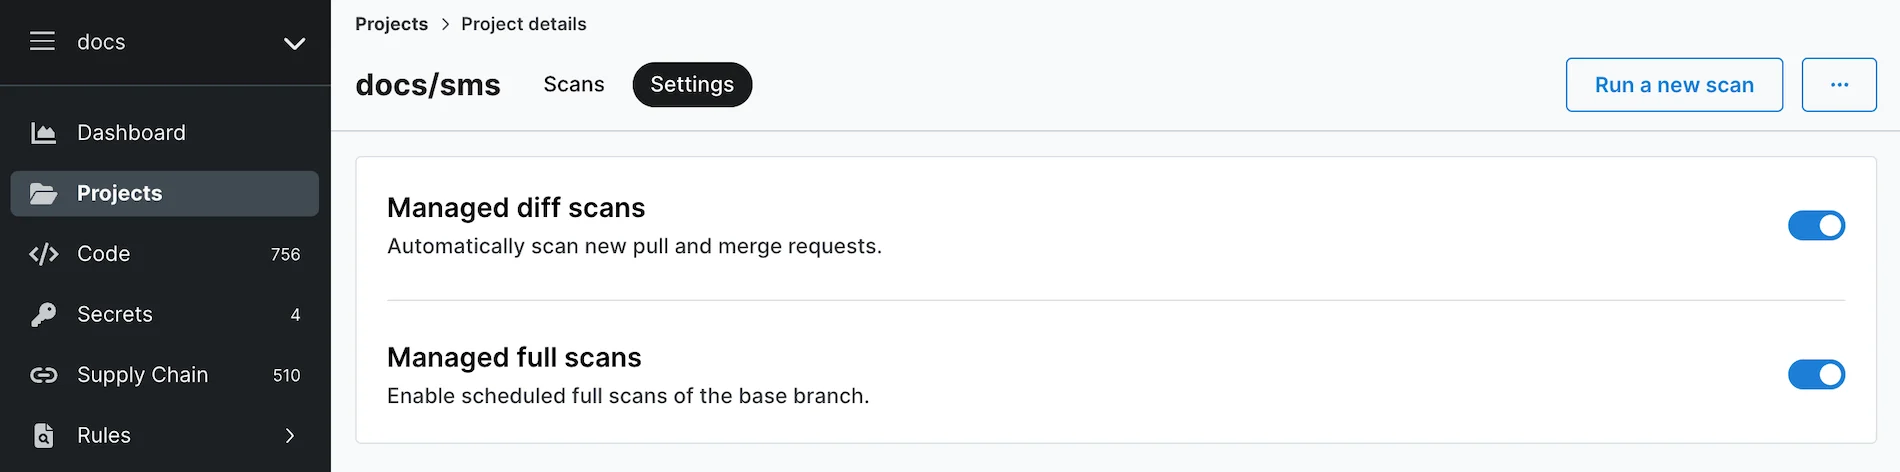
Enable status checks
To protect branches whose repositories are automatically scanned by Semgrep, enable Azure DevOps status checks:1
Sign in to Azure DevOps and navigate to the Azure DevOps project you’ve connected to Semgrep.
2
Go to Repos > Branches.
3
Find the branch to which the status check should be applied, and click the three vertical dots to open up the More options dialog.
4
Select Branch policies.
5
Ensure that the branch to which you want the status check applied is selected. Navigate to Status Checks, and click the Add + button to proceed.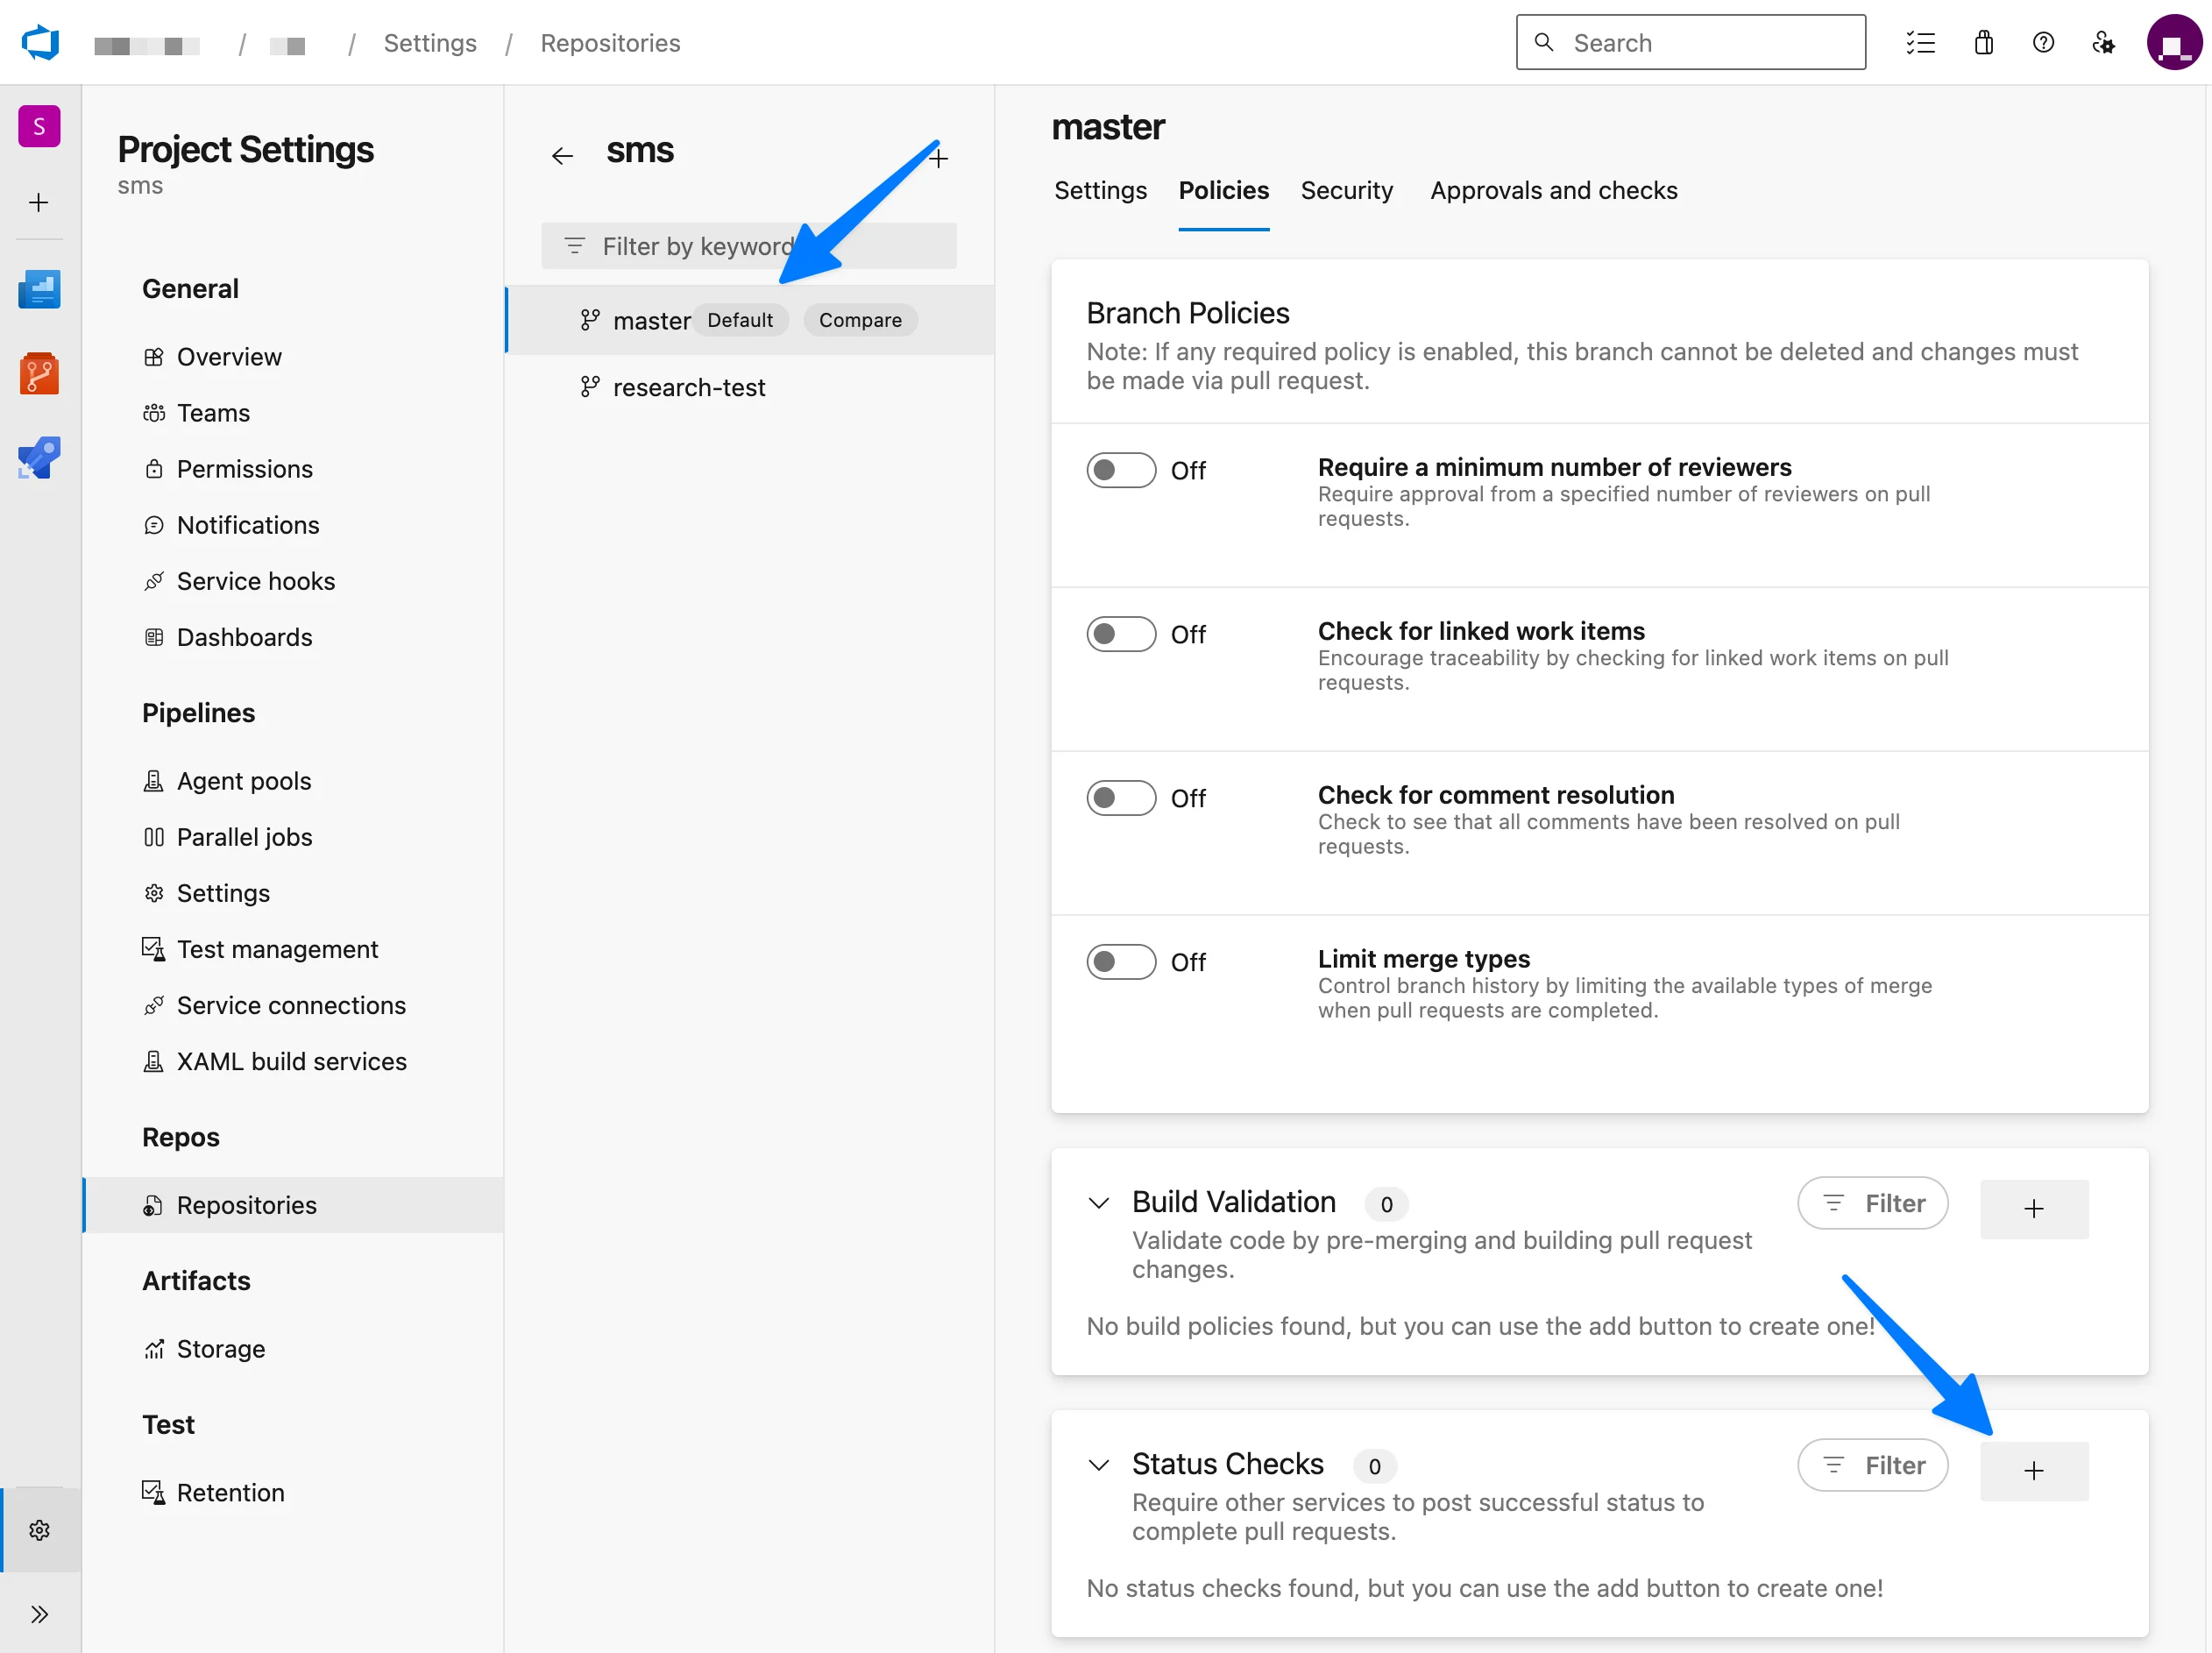
6
In the dialog that appears:
i. Leave the Status to check box blank, since this value is auto-populated as you provide values in subsequent steps.
ii. Select the Enter genre/name separately box. Provide the following values:
a. Genre:
b. Name:
iii. Choose whether the status check needs to succeed or not to complete pull requests. Selecting Required means that a status of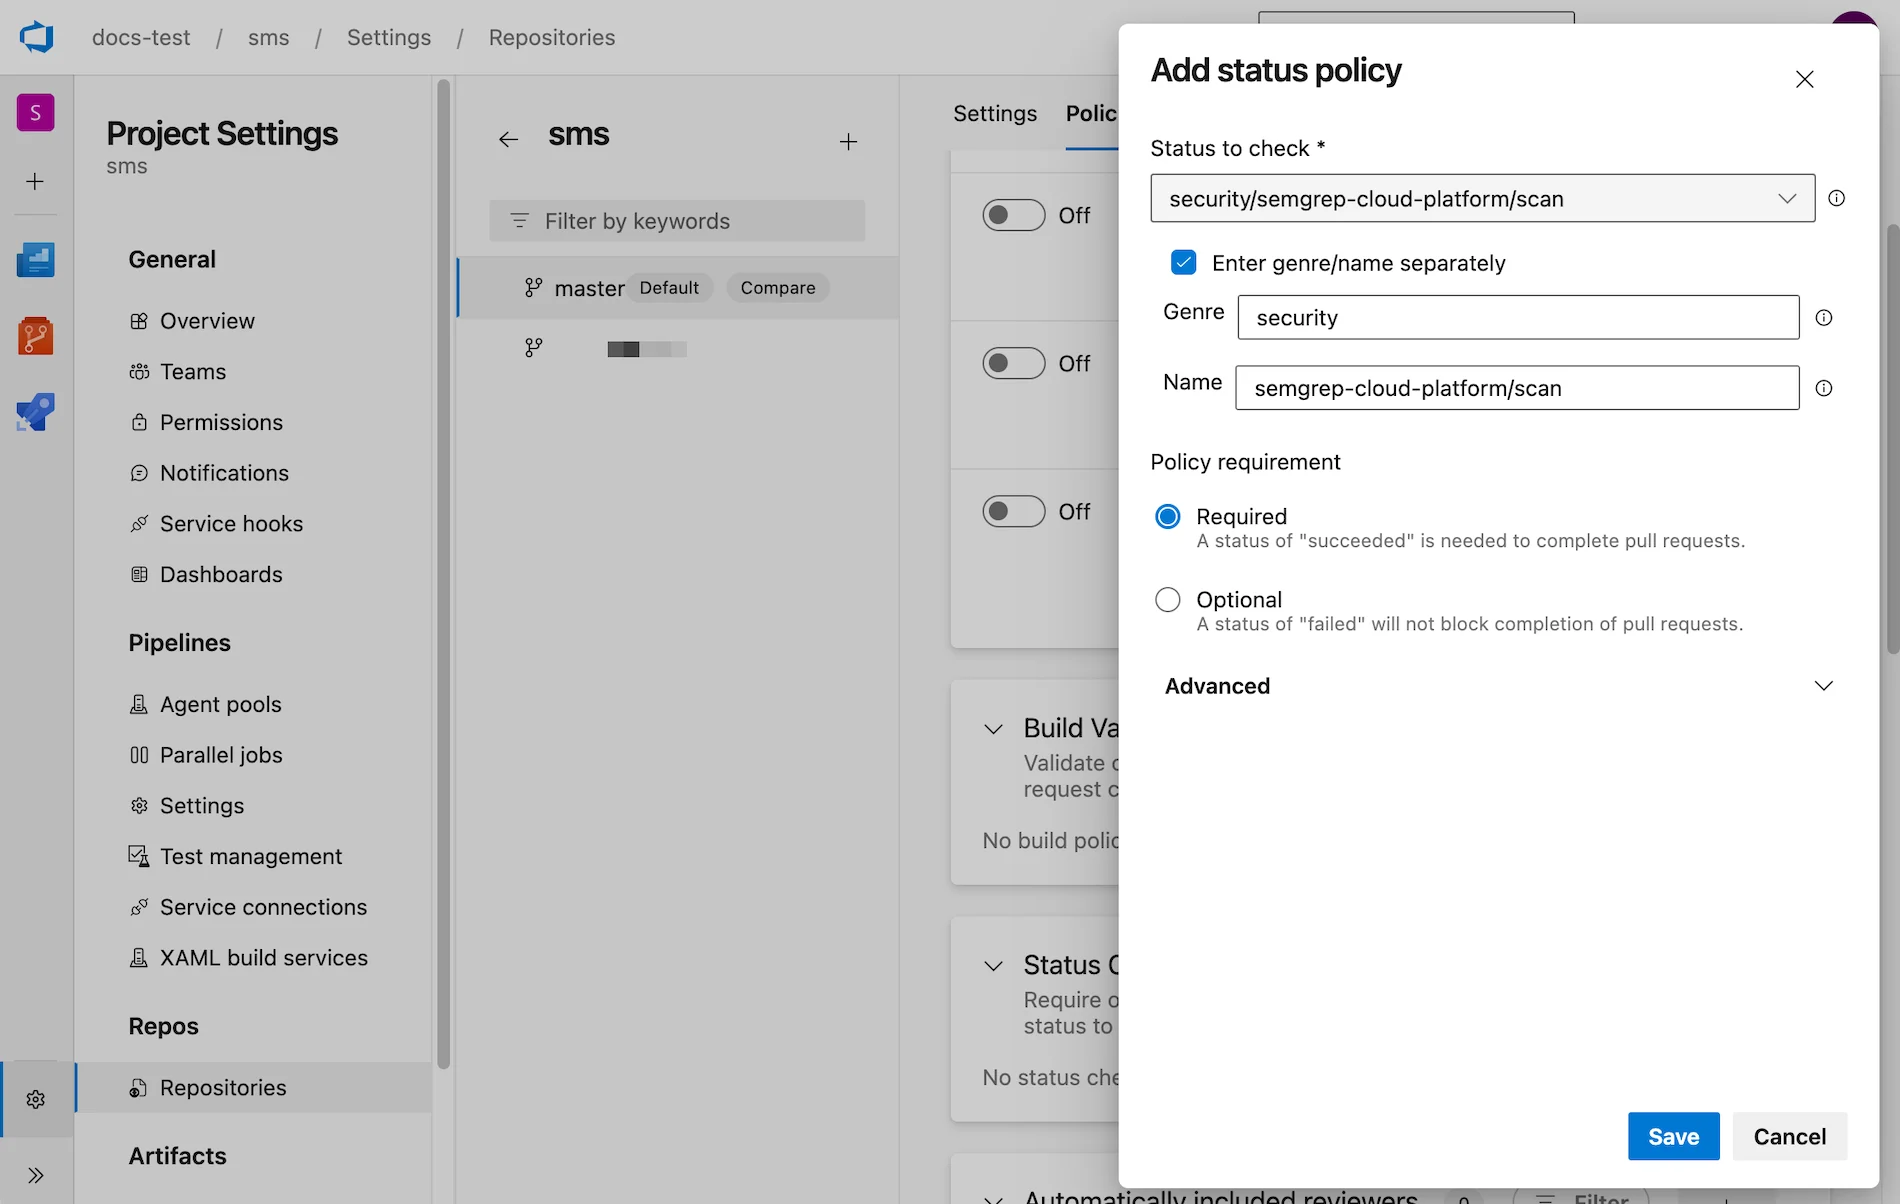
i. Leave the Status to check box blank, since this value is auto-populated as you provide values in subsequent steps.
ii. Select the Enter genre/name separately box. Provide the following values:
a. Genre:
securityb. Name:
semgrep-cloud-platform/scanOnce you provide the Genre and Name, Azure DevOps auto-populates Status to check. iii. Choose whether the status check needs to succeed or not to complete pull requests. Selecting Required means that a status of
succeeded is necessary to complete pull requests. Selecting Optional means that a status of failed will not block the completion of pull requests.7
Click Save to proceed.
Troubleshooting: multiple projects
If you currently scan Azure DevOps repositories in your CI pipeline, you may see findings assigned to two separate projects once you enable Semgrep Managed Scans. For example, findings from Managed Scans go to thesemgrep/frontend/webpage project, while findings from CI scans go to the frontend/webpage project. If this is the case, Semgrep AppSec Platform flags these findings with Possible duplicate. Please contact support for addition assistance.
Appendices
Scan logs and statistics
Scan logs and statistics
Scan logs
To view your scan logs in Semgrep AppSec Platform, go to Projects, then click on the project name. The projects in the list are sorted by scan date, with the most recent scans listed first.INFOIt can take a few minutes for your latest scan logs to appear. However, if the logs do not update 15 minutes after the scan, there may be issues with the scan itself.